The following is page four of an illustrated proof for the
Tough Sudoku of February 20, 2007.
The final page of this puzzle proof will be the next one.
You may need to refer to previous blog pages to understand
this proof. Links to these pages are found to the right, under Sudoku Techniques.
The information on the following blog pages is required to understand this page:
The illustrations of forbidding chains used in this proof will share the same key:
- black lines = strong links
- red lines = weak links
- black circles connected with black lines = multi-part strong sets
- candidates crossed out in red = candidates proven false
If you have made it this far, you are over the hump!
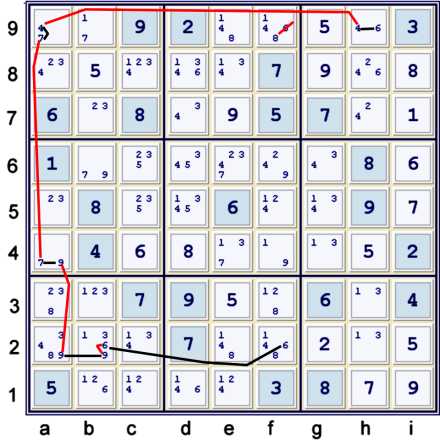
Another Puzzle Mark-up

The puzzle mark-up above is not significantly more encouraging than the previous one. Here is
what I see above:
- All the 5s are circled. There is certainly an AUR elimination of at least a 3. This
elimination does not look promising.
- All the 6s are circled
- All the 7s are circled
- All the 8s but one are circled
- All the 9s but one are circled
- Of the cells that are bivalue, 1s are dominant
- None of the underlined candidates look promising yet
- The Almost remote pair-like quality of f4 = i1 = 19 seems a likely suspect
At this point, for me, most of the puzzle is completely committed to memory. This generally
allows me to see many things all at once. Nevertheless, fatigue generally becomes a mind dulling
factor here.
Once again, if one wants to go deep with the analysis (by deep I mean consider 10 or more
strong sets at once), the puzzle is almost certain to unlock. I prefer more steps of less depth,
as a very deep analysis tends to look exactly like a guess. The next elimination has been
available for some time, but it required 8 or more strong sets before i5=7 occurred.
The final Complex Forbidding Chain

I probably should have graphed this chain a bit more cleanly. For me, b1≠9 upon inspection.
Here is what I see (but not exactly what I graphed):
- h3=1 => i1≠1 => i1=9
- f3=1 => h4≠1 => f4=9 ==>a4≠9 => b6=9
- b3=1 => b9≠1 => b9=7 => b6≠7 => b6=9
Since I have considered all possible 1s in row 3, clearly b1≠9.
The graphic above as a forbidding chain:
- i1=9 == i1=1 -- h3=1 ==1 {a4=7 == b6=7 -- b9=7 == b9=1 -- b3=1
==1 f3=1 -- f4=1 == f4=9} -- a4=9 == b2=9 => b1,g2≠9.
Naturally, there are many ways to get to the same point considering the same or similar sets.
The six strong sets considered in the illustration above are
- i1 = 19
- bfh3 = 1
- f4 = 19
- b9 = 17
- b6a4 = 7
- a24 = 9
Of these, only the 1s in row 3 are not indicated by the puzzle mark-up. Nevertheless, 1s have
been key thus far in slowly taming this beast.
The puzzle is advanced to 39 cells solved using the following Unique Possibilities (UP 39):
- g2=2, g8=9, i7=1, i1=9 - all % cell (naked singles)
- e7 = 9% row, column & box
Finally, a standard straightforward Forbidding Chain
Above, the newly strong 9s at ab2 make solving the sixes relatively easy:
- f2=6 == b2=6 -- b2=9 == a2=9 -- a4=9 == a4=7 -- a9=7 == a9=4 -- h9=4 ==
h9=6 => f9≠6
After making this elimination, all the sixes are solved as each becomes unique in a large house.
Unfortunately, after h9, d8, f2, b1 = 6 .... the puzzle is still resistant to
easy
techniques.
New Possibility Matrix
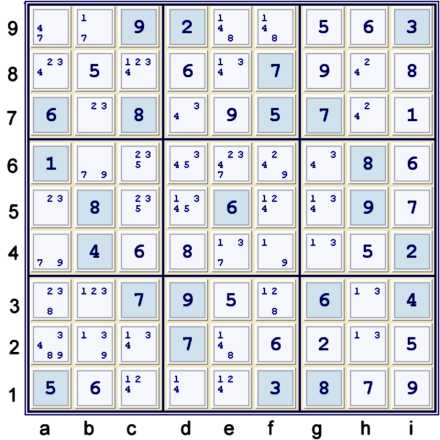
The puzzle still is resistant to easy techniques. At this point, almost
everywhere one may look will yield a fruitful chain.
Please visit the next blog page on this puzzle to see the puzzle finally solved!
