The following is an illustrated proof for the
Tough Sudoku of March 19, 2007.
The primary key used in this proof, like yesterday's proof, is Y wing styles.
This puzzle is relatively easy for a tough puzzle here at sudoku.com.au.
You may need to refer to previous blog pages to understand
this proof. Links to these pages are found to the right, under Sudoku Techniques.
At many times during this illustration, there are other steps available. It is not the goal
of this page to show every possible step, but rather to illustrate steps that, taken together,
unlock this puzzle.
The information on the following blog pages is required to understand this page:
The illustrations of forbidding chains used in this proof will share the same key:
- black line = strong inference performed upon a set (strong link)
- red line = weak inference performed upon a set (weak link)
- candidates crossed out in red = candidates proven false
Strong and weak need not be mutually exclusive properties.
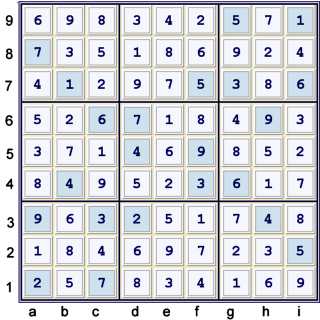
Puzzle at start
A few Unique Possibilities are available here:
- e5 = 6% box & row (hidden single)
- c4 = 9% box & row
- b5 = 7% box & column
Hidden Pair 49
h3=4 & h6=9 conspire to force a hidden pair at gi8, thus:
- gi9 = 49
- Locked 4s at gi9 =>
- Locked 9s at gi9 ->
- b9 = 9% box & column
Hidden Pair 36
The highlit 3s and 6s in row 7 and column c conspire to force a hidden pair at a9b8, thus:
- a9b8 = 36
- b6 = 2% column
- e4 = 2% box
- i5 = 2% columm
- g2 = 2% column
- g3 = 7% column
- i4 = 7% column
- i3 = 8% cell
- c8 = 5% row & box
- b8 = 3% column
- a9 = 6% cell & box
Puzzle Possibility Matrix at 36 cells solved (UP 36)
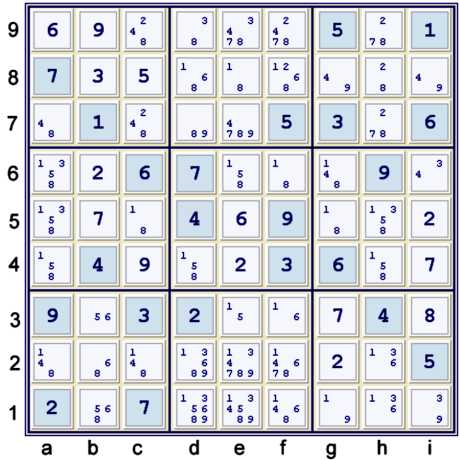
At this point in the puzzle, there are a great many steps available. Rather than list them
all, I will plunge directly into showing some possible key steps to unravel this puzzle. Most
of the easy steps one can find at this point are superflous to solving the puzzle.
How to find Very Common Y Wing Style
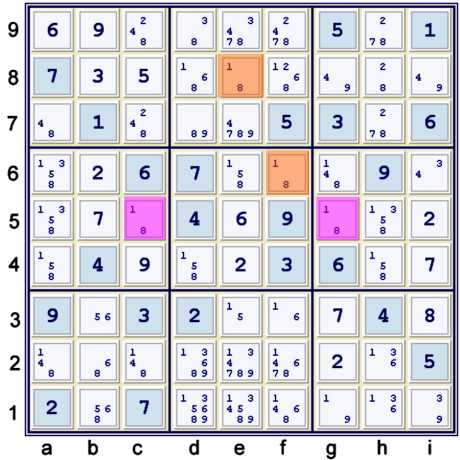
Illustrated above, there are 4 cells in the current puzzle that are limited to exactly 18. The
two in row 5 of course form a naked pair. The other two, at f6 and e8, are excellent candidates
for the endpoints of a Very common Y Wing Style. All one needs to complete the pattern
is a strong inferenence using either 1s or 8s (as the vertex). In this puzzle, the 1s in row 3
are almost too obvious!
This type of Y Wing Style is very common. Not only is it very common, but it is, in my
opinion, easier to spot than a typical Y Wing. I have often thought that this particular technique
should be taught before the typical 3 cell, 3 candidate Y wing. In fact, since it is both more
common, and easier to spot, the reasoning behind other sites not discussing this type of
Y Wing Style at more depth escapes me. Finally, I have found that many puzzles easily
unravel with this technique.
Probably, all this particular technique lacks is a really cool name.
Very Common Y Wing Style
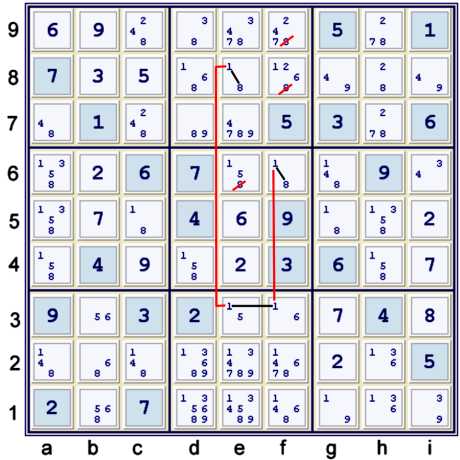
Above, the Very Common Y Wing Style is fully illustrated. The logic can be seen
as follows, using ef3=1 as the vertex:
- e3=1 => e8≠1 => e8=8 => d6,f89 ≠8
- f3=1 => f6≠1 => f6=8 => d6,f89 ≠8
As a forbidding chain, one can write:
- f6=8 == f6=1 -- f3=1 == e3=1 -- e8=1 == e8=8 => d6,f89 ≠8
This elimination reveals the naked pair 15 at e36, forbidding e8=1. After e8=8% cell, the puzzle
is reduced to hidden or naked singles to the end.
One can, of course, eliminate the 1 from e8 directly using Almost Locked Sets in a
forbidding chain (also called Alternating Inference Chain, or AIC) that
considers 4 strong inference sets as follows:
- e3=1 == f3=1 -- f6=1 == f6=8 -- e6=8 ==1 {pair 15 at e361} => e8≠1
Nevertheless, this page is a tutorial on
Y Wing Styles! It is almost universal that relatively
easy puzzles like this one present with multiple paths to achieve the same end.
Another Alternate Path Beginning with Locked Candidate 1

Among the very many easy steps that I did not take before is the ones locked in row 3 at ef3,
which forbid def12=1, as shown above. This is a set up for:
Y Wing Style using one cell, two bilocation strengths, two candidates
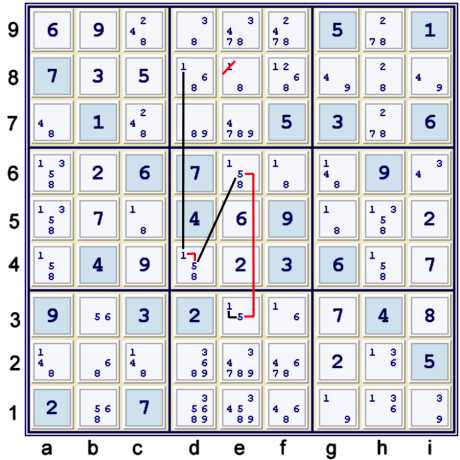
Illustrated above is a Y Wing Style much like the one presented in yesterday's blog.
Again, the puzzle mark-up that is explained at
Forbidding Chains 102, The Practice, combined with the page on Finding Y Wing Styles, can
easily lead one to locate this chain, as both 1 & 5 will be circled at d4. The logic here is
completely analagous to all Y Wings, and also the very common Y wing style presented above. Here,
d4,e6=5 is the vertex:
- d4=5 => d4≠1 => d8=1 => e8≠1
- e6=5 => e3≠5 => e3=1 => e8≠1
As a forbidding chain, one can write:
- e3=1 == e3=5 -- e6=6 == d4=5 -- d4=1 == d8=1 => e8≠1
Regardless of which of the paths illustrated here one takes, the end result is the same. The
puzzle unravels starting with e8 = 8% cell.
Solution
Proof
- Start at 22 filled - the given puzzle. Unique Possibilities to 25 filled. (UP 25).
- Hidden pair 49 at gi8 forbids cef8=4,bde8=9, gi8=28 UP 26
- Hidden pair 36 at a9b8 forbids a9=48, b8=258 UP 36
- Locked 1s at ef3 forbids def12=1
- Y Wing Style: e3=15, e6d4=5, d48=1 forbids e8=1 UP 81
- Sets: 2 + 2 + 1 + 3 = 8
- Max depth 3 at step 4.2
- Rating: 2(.03) + .01 + .07 = .14
Notes
If one decides to perform all the standard easy steps upon this puzzle before looking
for Y Wing Styles, one can find numerous Y wing Styles. There are so many available,
that to list all the of them would be tedious indeed. If you wish, this puzzle is an excellent
exercise in finding Y wing styles.