The following is an illustrated proof for the
Tough Sudoku of March 01, 2007.
There are many ways to tackle this one. The primary focus of this page is to illustrate
using Forbidding Chains, also called Alternating Inference Chains or AIC.
You may need to refer to previous blog pages to understand
this proof. Links to these pages are found to the right, under Sudoku Techniques.
At many times during this illustration, there are other steps available. It is not the goal
of this page to show every possible step, but rather to illustrate steps that, taken together,
unlock this puzzle
The information on the following blog pages is required to understand this page:
The illustrations of forbidding chains used on this blog page will share the same key:
- black lines = strong links
- red lines = weak links
- candidates crossed out in red = candidates proven false
Many steps that are possible will not be shown to keep the page as short as possible.
However, every step that is shown can be justified by considering only the previous illustrated
steps.
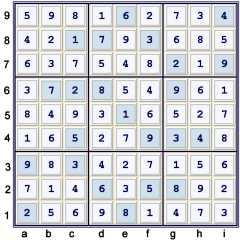
Puzzle at start
A few Unique Possibilities are available here.
- b3 = 8% box & row
- b1 = 5% box
- c1 = 6% box
- d4 = 2% cell
- e4 = 7% cell
Hidden Pair 29 at UP 28
As noted in previous blog pages, before entering the possibilities, it is often easy to find
Hidden Pairs based upon relative symmetry.
Illustrated to the left, the highlit 29's are symmetrical with respect to row 8. Thus, cells
b8, e8 are limited to only 29. After noting the Hidden Pair,
Hidden Pair 49 at UP 29
After solving cell a8=4, 49 are located symmetrically relative to box b5 as shown, revealing
Hidden Pair 49 at bc5. Since the 4's are Locked in box b5 in row 5, df5≠4, yielding
Editors note: I found the hidden pair 35 at d5e6 first, considering f2=5, f8=3. One only
needs the locked 4's then at bc5 to get the listed cell solutions, as f6=4% box and then
f5=6% box. The full hidden pair 49 is listed above, as it is required to make a later step.
If you prefer to enter the possibilities first, you can get to the same points using naked
sets. Nevertheless, finding hidden pairs is often easier if you ignore the possibility matrix.
Puzzle at UP 31 - Another Hidden Pair
Considering the relative symmetry of 39 relative to box e2, there exists Hidden Pair 39
at cells d1, e2. Since this eliminates d1=4,
There have been many hidden pairs using candidate nine so far. Oftentimes, puzzles follow
a pattern of one candidate being an early key to further eliminations. At this point, if one
fills in the possibility matrix, the following steps are available, but not required for this
proof: In order to follow this proof, one needs none of these steps.
- Locked 1's at ab2 forbids hi2=1
- fc on 1's: g9 == g3 -- d3 == d79 forbids f9=1
- Locked 2's at ef3 forbids hi3=2
- Locked 3's at h79 forbids h12=3
- Locked 3's at a56 forbids a79=3
- Locked 5's at ghi8 forbids gh9,h7=5
- Locked 6's at ab7 forbids h7=6
- Locked 7's at ac2 forbids hi2=7
Ignoring these steps is ok. Using these steps is also ok. In either event, one can continue as
follows.
Puzzle at UP 32 - Locked candidate 8 - twice
Illustrated to the left, cells solved as 8 or that contain possible 8s are highlit, yielding:
- Locked 8's at a45 or
- Locked 8's at c79
- Locked 8's at hi8
One could perform all the listed eliminations on 8s with one step
- X wing on 8's at cf79 => ah79≠8
At this point in the puzzle, in my opinion, forbidding chains or something equivalent to
them become a requirement for further progress. The standard puzzle mark-up revealed in
Forbidding Chains 102, The Practice
will indicate a number of potential areas to investigate for such chains. Since the
9s have been very active so far, and since a few of them exist in cells containing two circles
in the puzzle mark-up, it should not be hard to find the following Y wing style
chain.
Puzzle at 32 cells solved - Y wing style chain
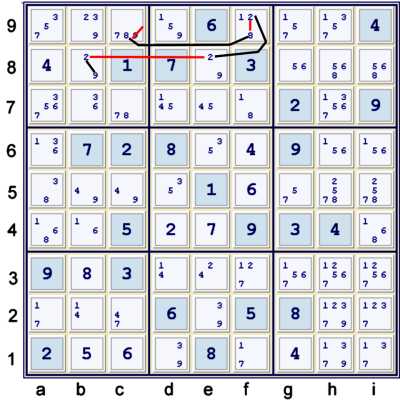
Illustrated above is the following Y wing style as a forbidding chain:
- c9=8 == f9=8 -- f9=2 == e8=2 -- b8=2 == b8=9 => c9≠9
Please note that there is no reason that the relationship between e8=2 and b8=2 be called
only strong. It is both strong and weak. Strong and weak need not be mutually exclusive properties.
In this case, it is the forbidding nature of their relationship that is required in the chain.
One could always call a weak link a
forbidding link. Perhaps that nomenclature is less
confusing.
Using logic closer in style to a forcing chain:
- c9=8 => c9≠9
- c9≠8 => f9=8 => f9≠2 => e8=2 => b8≠2 => b8=9 => c9≠9
Using Y wing style logic: (centering on the vertex)
- f9=2 => f9≠8 => c9=8
- e8=2 => b8≠2 => b8=9
- c9=8 & b8=9 both => c9≠9
Using this elimination, one can solve a few more cells using cascading Unique Possibilities:
- c5 = 9% column
- b5=4, b2=1, a2=7, c2=4, b4=6, b7=3, a9=5, a7=6 all % cell
- h9 = 3% row & box
Puzzle at 42 cells solved - UP 42
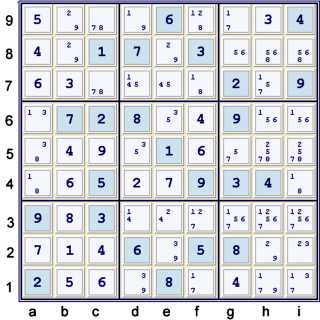
At this point, the puzzle mark-up will reveal almost too much information. This is not a
failure of the mark-up, but rather indicates that almost everywhere one searches, there will be
fruitful chains. I am ignoring the following additional steps, as I do not need
them in my proof. Use of these steps will neither help nor hinder one in following the
rest of this page.
- Hidden pair 45 at de7 forbids d7=1, h7=5
- X wing on 1's at dg39 forbids fhi3, f9=1
There are many paths to take here. I will illustrate one path that focuses primarily now
on 1s. Although I have chosen not to execute the steps above in my illustration, those steps
indicate to me that the 1s are perhaps almost begging to unlock the puzzle.
Another Y wing style chain
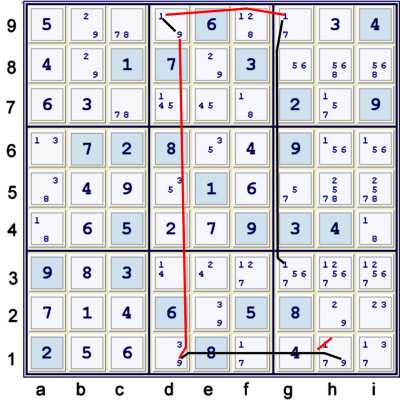
Illustrated above is a typical Y wing style chain using cell d9=19 as the vertex.
Again, it is perfectly ok that d1=9 == d9=9 and d1=9 -- d9=9. The chain requires only the latter:
- h1=9 == d1=9 -- d9=9 == d9=1 -- g9=1 == g3=1 => h1≠1
It is very common that a cell limited to exactly two values forms a bridge between two candidates
in a chain. This same concept is used again in a slightly longer chain:
Forbidding Chain (AIC) using four strong sets
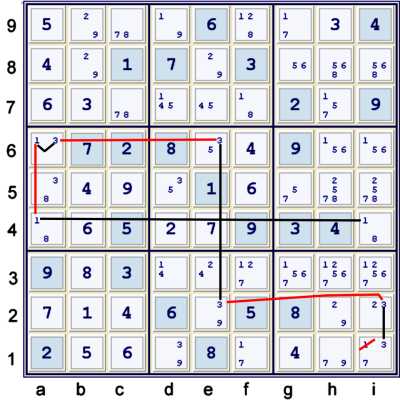
Above, the cell a6=13 acts as a bridge between 1s and 3s. Again, note that native strong
sets are also weak, and that the chain uses whichever relationship is required:
- i1=3 == i2=3 -- e2=3 == e6=3 -- a6=3 == a6=1 -- a4=1 == i4=1 => i1≠1
Basically, the chain can be read either left to right, or right to left (all properly
written forbidding chains can be read in both directions). Reading left to right, the chain says:
- i1=3 or
- i1≠3 => .... => i4=1
Reading right to left, the chain says:
- i4=1 or
- i4≠1 => .... => i1=3
No matter which way one reads it, at least one of {i4=1, i1=3} must be true, and
both {i4=1, i1=3} => i1≠1. This is precisely the same as saying:
Starting now with f1=1% row, the puzzle is easily solved using cascading Unique Possibilities,
all of which are % cell (naked singles).
Solved Puzzle
Proof
- Start at 23 filled - the given puzzle. Unique Possibilities to 28 filled. (UP 28).
- Hidden pair 29 at be8 forbids b8=46, e8=45 UP 29
- Hidden pair 49 at bc5 forbids df5=4, b5=36, c5=8 UP 31
- Hidden pair 39 at d1e2 forbids d1=14, e2=24 UP 32
- Locked 8's at hi8 forbids h79=8
- Locked 8's at a45 forbids a79=8
- Y wing style: c9=8 == f9=8 -- f9=2 == e8=2 -- e8=9 == b8=9 forbids c9=9 UP 42
- Y wing style: h1=9 == d1=9 -- d9=9 == d9=1 -- g9=1 == g3=1 forbids h1=1
- i4=1 == a4=1 -- a6=1 == a6=3 -- e6=3 == e2=3 -- i2=3 == i1=3 forbids i1=1
UP 81
- Sets: 3(2) + 2(1) + 3 + 3 + 4 = 18
- Max depth 4 at step 6.2
- Rating: 2(.01) + 3(.03) + 2(.07) + .15 = .40
