The following is an illustrated proof for the
Tough Sudoku of March 22, 2007.
The primary advanced keys used in this proof are coloring,
Y wing styles and forbidding chains or Alternating Inference Chains
(AIC).
You may need to refer to previous blog pages to understand
this proof. Links to these pages are found to the right, under Sudoku Techniques.
Often during this illustration, there are many other steps available. It is not the
goal of this page to show every possible step, but rather to illustrate steps that, taken
together, unlock this puzzle.
To understand this page, some previous blog pages that could be particularly helpful are:
The illustrations of forbidding chains used in this proof will share the same key:
- black line = strong inference performed upon a set (strong link)
- red line = weak inference performed upon a set (weak link)
- black containers define either
- the partitioning of native strong inference sets
- a grouping of more that one native strong inference set
- candidates crossed out in red = candidates proven false
Strong and weak need not be mutually exclusive properties.
Puzzle at start
Only two Unique Possibilities are available here:
- i1 = 7% column & box (hidden single)
- g1 = 8% cell (naked single)
Naked pair 45

Above, pair 45 at g25 is illustrated as a wrap around forbidding chain. One could also use
the Hidden Pair 23 at g48. In either case, the eliminations are precisely the same.
There are some eliminations available at this point, and later, that I will not use. Using them
may expose a better path than the one I found. Let me know if you find such a path.
Note that there exists here a very pretty wrap around, or continuous nice loop, Y Wing Style
in the lower third of the puzzle involving candidates 6 & 9. See if you can find it. Unfortunately,
it does not seem to significantly help in solving this puzzle. Therefor, I will not illustrate
it, but rather leave it as an exercise.
Coloring on 5s
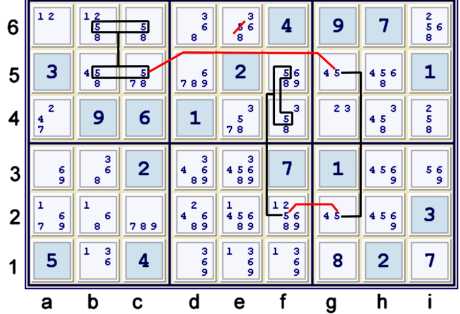
The elimination justified above uses three native strong inference sets. As such, it is also
a Y Wing Style. As a Y Wing Style, the logic considers the 5s in column g as the vertex:
- g2=5 => f2≠5 => f45 contains 5 => e6≠5
- g5=5 => bc5≠5 => bc6 contains 5 => e6≠5
As a forbidding chain on 5s (fc on 5s) one can write:
- bc6 == bc5 -- g5 == g2 -- f2 == f45 => e6≠5
This particular elimination uses grouped arguments three times within the chain. As such, it
is a good example as to why one needs to concern oneself with such arguments.
Coloring on 5s - alternate justification of the same elimination
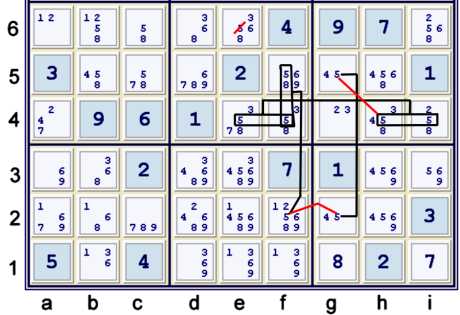
Above, I have illustrated the same elimination a slightly different way. Only one of the
native strong sets considered is different. This particular elimination is harder to graph,
but not harder to grasp. The fact that the chain endpoints overlap each other is of no concern.
Some net analyses would make a large deal of this overlap. In terms of analyzing this elimination,
over-thinking the overlap can lead to false conclusions. This particular graph is
not a continuous loop, or wrap around chain, as f45=5 and ef4=5 are not in conflict with each
other, since f4=5 satisfies both. The Y Wing style logic is precisely as before, except:
- g5=5 => hi4≠5 => ef4 contains 5 => e6≠5
The other leg is the same. As a forbidding chain on candidate 5, one can write:
- f45 == f2 -- g2 == g45 -- hi4=5 == ef4=5 => e6≠5
It is very common that a coloring elimination will have multiple representations possible. This
is also the case with every elimination. I present the alternate approach here to encourage
depth of understanding.
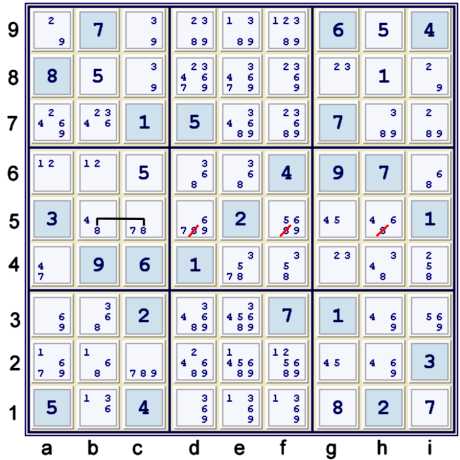
Y Wing Style on candidates 457
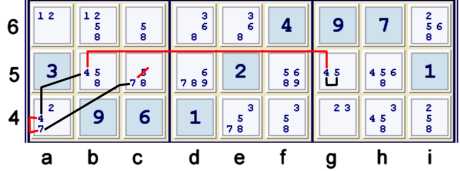
The Y Wing Style above uses the 4s in box b5 as the vertex. As such,
- a4=4 => a4≠7 => c5=7 => c5≠5
- b5=4 => g5≠4 => g5=5 => c5≠5
As a forbidding chain:
- g5=5 == g5=4 -- b5=4 == a4=4 -- a4=7 == c5=7 =>c5≠5
This last step is a set up for the next.
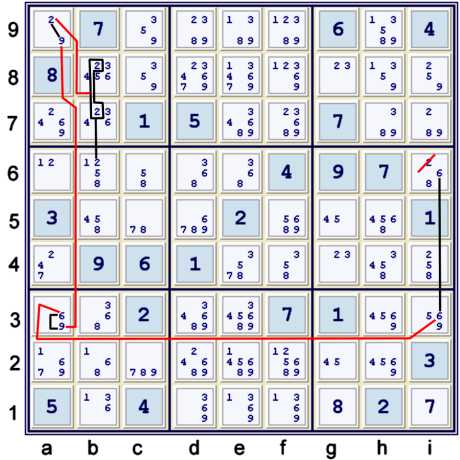
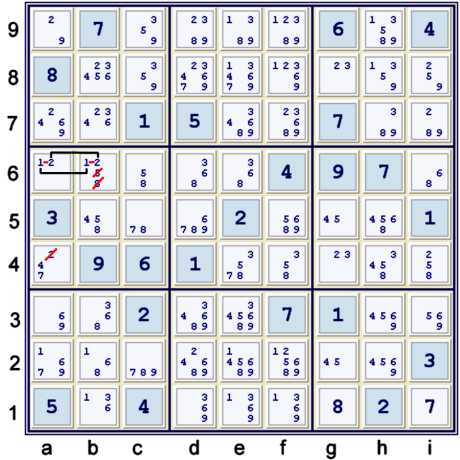
Almost Locked Set in a chain

The elimination above can be viewed as centering upon c2=9 or c2≠9. One could say
it relies upon:c2=9 == c2≠9. Typically, one does not actually write that type of strength
in a chain, as it is always true, for every candidate, in every cell! The logic could be thought
of as follows:
- c2=9 => a3≠9 => a3=6 =>i3≠6 => i6=6 => i6≠5
- note that one needs the full possibility matrix to see that
6 in column i is limited to only i36. Trust me that is the case here.
- c2≠9 => naked pair 78 at c25 => c6≠8 => c6=5 => i6≠5
As a forbidding chain, one can write:
i6=6 == i3=6 -- a3=6 == a3=9 -- c21=9 == {pair 78 at c521} -- c6=8 == c6=5 => i6≠5
The subscripts denote the partioning of the native strong inference set, c2=789, into two pieces:
- c2=9
- c2=78
- Often, for such simple ALS partitions, the subscripts are omitted
The brackets contain a Boolean that is actually a wrap around chain. Both ends of that chain
forbid the c6=8, and the chain exists OR c2=9. The previous puzzle proof,
Almost Locked Sets Proof of March 17,
2007, gives another illustration of an
Almost Locked Set used in a chain.
Notice that I have been beating upon candidate 5. Oftentimes it seems that a puzzle has such
a theme - one candidate is an early key. It is not clear to me if, in this puzzle, the 5s truly
are the key, or if the early chain that I saw on 5s caused me to look at them harder.
Often, finding one chain leads one to find the next. Such is the case with the next step. I
actually saw the next step first - and it led me to find the step just illustrated above.
Fairly typical chain involving four strong sets
The chain illustrated above uses two of the same strong sets that the previous chain did:
- i6=6 == i3=6 -- a3=6 == a3=9 -- a9=9 == a9=2 -- b78=2 == b6=2 => i6≠2
The standard puzzle marks that I advocate would underline the 2 at b6 and place a
V
there pointing towards a9=9. This step, though, is a bit challenging to find. For me, the fact that
I had previously found the aforementioned but not illustrated wrap around Y Wing Style chain
using candidates 69 helped me to see this chain.
Although the step just illustrated did not directly eliminate another 5, it is still consistent
with the apparent theme of beating up on the 5s. The next step will illustrate this fact.
Hidden Pair 12
The last step reveals a Hidden pair involving candidates 1 & 2 at ab6. One could instead find
the naked triple 368 at dei6. However, if one uses the naked triple, one might require another step to
eliminate the 2 from a4. I often use such efficiencies in a proof. The step is illustrated above
as a wrap around forbidding chain:
- b6=1 == a6=1 -- a6=2 == b6=2 => ab6=12 & a4≠2
This last step, by eliminating yet another 5, allows one to finally solve a few cells:
- c6 = 5% row
- b8 = 5% column & box
- h9 = 5% row & box
- h8 = 1% column & box
The puzzle now solves easily using standard
easy techniques. For completeness, I will
show a path to finish this puzzle off.
Locked candidate 8
Since the 8s in box b5 are limited to only bc5, one can remove 8 from the rest of row 5. This
step can also be written as a forbidding chain:
Hidden Pair 38
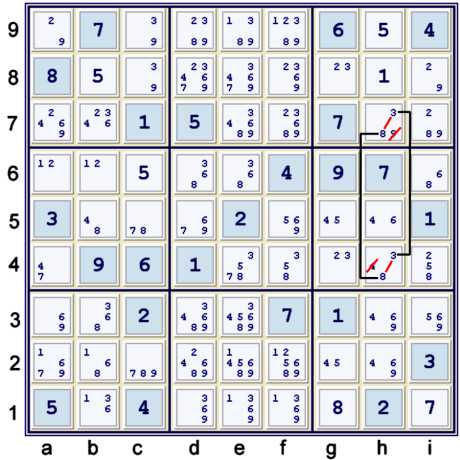
The previous step reveals the Hidden Pair 38 at h47, or alternatively the Naked Triple 469 at
h235. Either way, precisely the same items are eliminated.
These eliminations begin a cascade of hidden singles and naked singles, starting with
a4 = 4% row, that finish the puzzle (UP 81).
Solution

Proof
- Start at 23 filled - the given puzzle. Unique Possibilities to 25 filled. (UP 25).
- Pair 45 at g25 forbids g4=45, g8=5
- fc on 5's: bc6 == bc5 -- g5 == g2 -- f2 == f45 forbids e6=5
- Y wing style: g5=54, b5,a4=4, a4,c5=7 forbids c5=5
- i6=6 == i3=6 -- a3=6 == a3=9 -- c2=9 == {pair 78 at c25} -- c6=8 == c6=5 forbids i6=5
- i6=6 == i3=6 -- a3=6 == a3=9 -- a9=9 == a9=2 -- a46=2 == b6=2 forbids i6=2
- Hidden pair 12 at ab6 forbids a4=2, b6=58 UP 29
- Locked 8s at bc5 forbids dfh5=8
- Hidden pair 38 at h47 forbids h7=9, h4=4 UP 81
- Sets: 2 + 3 + 3 + 5 + 4 + 2 + 1 + 2 = 22
- Max depth 5 at step 2.4
- Rating: .01 + 3(.03) + 2(.07) + .15 + .31 = .7
Notes
I suppose that the path that I illustrated could also be viewed as primarily beating up on
the candidates in row 6. I did not actually intend to do that, and just noticed the pattern in
retrospect.
I did find an alternate manner to solve this puzzle that is maximum depth 4. Because that
manner involved more steps and more sets, it rated (using my obscure rating system) higher.
If one wishes to, feel free to look for Max depth 4 (maybe even Max depth 3?!) proofs for
this puzzle.
In any event, this puzzle is a bit harder than those of the last few days. As such, it is
an excellent study on the flexibility and utility of forbidding chains or
AIC.